How to improve the performance of windows OS?


          This post is about how you can improve performance of your computer (in terms of booting and memory access speed). Many computer user suffers from bad performance of their computer. Many of you also says that when computer was new it was working fine but by time its speed goes down and down. To overcome this problem regular maintenance is required. I am not saying anything new in this post but if you do this then definitely achieve good performance of your computer.

Close Start-up programs

Close the unnecessary  programs from start-up. Means software like Skype, Blue Stack  Nokia suite are generally starts With operating system. So it will consume time at start-up which is not required every time. By disable them you can improve booting speed.


Clean Temporary (cache) files and Invalid Registry

Delete all temporary files from temp folder.To do that open temp folder select all and press delete. There may be possible that some file will not be deleted because of they are in use in some process.


To remove Cache, temporary files and to clean invalid registry use software like CCleaner.
Cache cleaner
reg Cleaner


Defrag memory

To enhance memory access speed Defrag all the drives. Sometimes Computer will take more time to open My Computer and for display drives. By doing this indexing and fragmentation will done. So memory access speed will increase.
NOTE: This will take some time around an hour according to your data stored. Please don't access drive while fragmentation.
defregmenter
defrag


Hope this information will help you.
I would really appreciate your feedback, suggestions, requests and ideas.

Thank You.


Run "graphics.h" in Ubuntu


        This post is about how you can run graphics program in Ubuntu platform. Generally we run graphics program in Turbo C on windows platform. If you are addicted to gcc compiler then it is not providing inbuilt facility to run graphics.h library. So you are not able to run graphics in C language, to run "graphics.h" library in Ubuntu, following are some simple steps.


Steps:


#1
Make sure that you have basic compilers installed. For this run the command:
     sudo apt-get install build-essential

#2
Install few packages that required. Run the command:
     sudo apt-get install libsdl-image1.2 libsdl-image1.2-dev guile-1.8 guile-1.8-dev libsdl1.2debian libart-2.0-dev libaudiofile-dev libesd0-dev libdirectfb-dev libdirectfb-extra libfreetype6-dev libxext-dev x11proto-xext-dev libfreetype6 libaa1 libaa1-dev libslang2-dev libasound2 libasound2-dev

#3
Now download libgraph.
Copy libgraph-1.0.2.tar.gz to your home folder. Right click on it and select "Extract Here".
Then run following commands one by one.
     cd libgraph-1.0.2
     ./configure
     sudo make
     sudo make install
     sudo cp /usr/local/lib/libgraph.* /usr/lib

#4
Now Ubuntu is ready to run graphics program. To do that add #include<graphics.h> in your C program.

>>In Turbo C we use following lines
     int gd=DETECT,gm; 
     initgraph(&gd,&gm,"c:\\tc\\bgi");
>>In Ubuntu instead of "c:\\tc\\bgi" write NULL
     int gd=DETECT,gm; 
     initgraph(&gd,&gm,NULL);
Here is a sample program to test it's working or not. sample.c
Run it with following command:
     gcc sample.c -o sample -lgraph
     ./sample
If you get following screen then my job is done.
sample_output

Hope this information will help you.
I would really appreciate your feedback, suggestions, requests and ideas.

Thank You.


How to change MAC address in Ubuntu?


          This blog is about how you can change MAC address of your computer on Ubuntu operating system. Generally we think that MAC address is unique identity, it's true using that your device is identified on the network. IP address may changed dynamically network to network (by DHCP or static ip allocation). But MAC address can be changed, on Ubuntu operating system you can easily do that. No need to download anything extra.

          Now you are thinking that "Why we need to change our MAC address?". The reason behind that is if network is restricted for some MAC address or for registered users then you are not able to access the network. This situation generally we face in college campus. If you wanna to access it without register your device then you need to change MAC address to a registered device's MAC address. You can get it from your friend who has registered their device on that network.


Steps:

1)   Open the "Network Connections" from Settings or directly by pressing Super (or windows) key.
Open network connections

2)   Now select a network for which you wanna to change MAC address. Press Edit button.
Select a network

3)   In image Device MAC address shows your original MAC address. Now below this row, there is Cloned MAC address which is initially blank. Enter new MAC address in proper format and press Save button. So you are ready with new MAC address for this network connection.
Enter new MAC
Note:


Hope this information will help you.
I would really appreciate your feedback, suggestions, requests and ideas.

Thank You.


Change IP address and location of your computer using "Tor Browser"


          This post is about how you can change IP address and location of your computer by one click. Many times we require to change IP address for different purpose and also location (country) nedd to be changed. Sometimes you require to browse internet anonymously or securely without sending your identity. Most important thing is you can also open restricted sites like 'Facebook' in college. For this purpose "Tor Browser" is required. In this post i will demonstrate it using tor browser. You can download it from here.

          Tor (originally short for The Onion Router) is free software for enabling online anonymity. Using Tor makes it more difficult to trace Internet activity, including "visits to Web sites, online posts, instant messages and other communication forms", back to the user and is intended to protect users' personal privacy, freedom, and ability to conduct confidential business by keeping their internet activities from being monitored.

Steps:

1)   Go to TorBrowser and download 'Tor Browser Bundle' as par your platform (windows 7, Ubuntu, etc...).

2)   For windows, downloaded file is in .exe format. Just double click on it, it will ask for location to extract files. After selecting location press 'Extract'. On completion of operation a folder named 'TorBrowser' is created.
extract
3)   Now open that folder and run 'Start Tor Browser.exe' It will start the process to connect Tor Network. After established tor connection it will shows a window like this
Tor connection
4)   One browser window will pop-up automatically looking like Firefox browser. It is Tor Browser. It shows IP address of current connection.
TorBrowser
5)   Now you ready to browse internet securely. You can browse internet like a normal browser.


Best Feature:

  • In One click IP address and location can be changed. To do that click on "Use a new Identity" in connected Tor window. Within few second current browser will close and new one will open with new identity.
New Identity


Hope this information will help you.
I would really appreciate your feedback, suggestions, requests and ideas.

Thank You.


Start Android debugging using Android Debug Bridge (adb).


          This post is about how to use android debug bridge (adb) to debug or access android device. The adb is a toolkit included in the Android SDK package. It consists of both client and server-side programs that communicate with one another. The adb is typically accessed through the command-line interface. The adb is also a versatile tool that lets you communicate with an emulator instance or connected Android-powered device.

          Basic functions we can perform using the adb are:

  1. adb push/pull  (to copy data from or to android device)
  2. adb backup/restore (to take backup or restore)
  3. adb logcat (show live log of all processes running on device)
  4. adb shell (used for package manager, activity manager)
          To use this you need Android SDK package that can be downloaded from Here. You can find the adb tool in <sdk>/platform-tools/. Go to folder in which adb package is available and enter command
               "chmod +x adb"

NOTE: if you are using Linux then type './' before every command(if PATH is not set).

Connected using USB cable:

               "adb kill-server"

               "adb start-server"

               "adb devices"

          You will find serial number of device as connected by given commands. Now you are ready to perform following task.

ADB functions:


1)   adb push/pull
  • Copy file from computer to device:
               "adb push README.rst /mnt/sdcard"
  • Copy file from device to computer:
               "adb pull /mnt/sdcard/README.rst /tmp"
  • Copy folder from computer to device
               "adb push data /mnt/sdcard/data"
  • Copy folder from device to computer
               "adb pull /mnt/sdcard/data /tmp/data"

2)   adb backup/restore
  • Take backup:
               "adb backup -all -f /tmp/backup.ab"
               Now unlock your android device, and select "Backup up my data". You can optionally set a
               password too. This process doesn't has progress bar.
backup
  • Restore from previous backup:
               "adb restore /tmp/backup.ab"
               This will again ask for confirmation on android side, select "Restore my data" to start restore
               process. This process also doesn't has progress bar.

3)   adb logcat:

  • This will simply show live log of all processes running on device.
               "adb logcat -d"

4) adb shell:
  • This is to execute any shell command inside android environment. General syntax is
               "adb shell <command>"

  • package manager (pm)
               (pm) tool perform actions and queries on application packages installed on the device. Syntax to
               use
               "adb shell pm <command>"

               To retrieve package list of installed application
               "adb shell pm list packages"

               To uninstall package
               "adb shell pm uninstall com.example.my_app"

               To set install location for apk's, internal or external sdcard
               "adb shell pm set-install-location <code>"
                              0 : Auto—Let system decide the best location
                              1 : internal device storage
                              2 : external media

               To get current install location
               "adb shell pm get-install-location"

  • activity manager (am)

               Within an adb shell, one can issue commands with the activity manager (am) tool to perform
               various system actions, such as start an activity, force-stop a process etc.

               "adb shell am start -a android.intent.action.VIEW"
               This will open "Complete action using" menu.


               kill all background apps

               "adb shell am kill-all"


Hope this information will help you.
I would really appreciate your feedback, suggestions, requests and ideas.

Thank You.


How to use Ubuntu Desktop easily?


          This post is about how easily and efficiently we can work with Ubuntu operating system. Using Ubuntu is much much easier then normally people afraid of Linux environment. It is as easy as you are using windows environment. Every task you performs on windows environment that also can be performed using Ubuntu. There are many software available for Ubuntu to work comfortably as you work on windows operating system.

          You can take tour of using Ubuntu online 'Start tour'.


          Ubuntu is an operating system based on Linux kernel and the Linux distribution Debian. It is open source so no need to purchase license copy and most of software are also available freely. It also helps to stop piracy of software and lead towards new invention. List of few software available on Ubuntu vs Windows is shown below.


   Task to be performed        Available Software on different environment    
Windows Ubuntu
Text editor notepad, notepad++ gedit, vi-editor
Documentation MS-Word (purchase) LibreOffice Writer
Presentation MS-Power point (purchase) LibreOffice Impress
Spreadsheet MS-Excel (purchase) LibreOffice Calc
Image Editor Paint GIMP Editor
CD burner Nero (purchase) Brasero Disk Burner
Audio video player VLC VLC
Internet Browser Chrome, Firefox ... Chrome, Firefox(default)...
PDF reader Adobe Reader Document Viewer(default),
Adobe Reader
Resource Monitor Task Manager System Monitor
Anti virus Quick Heal, Norton (purchase) Not required


          Some of the software like Android-SDK will work more faster in Ubuntu. There are so many software available you can search and install it using 'Ubuntu Software Center'.


          As you search application and features in computer on windows OS by pressing 'Windows Button' or 'Super Button' similar thing is available by pressing same button. This is called 'Dashboard'. Just type what you want in computer and get as shown in image.

Dashboard of Ubuntu


Useful shortcuts and commands:

  • Open terminal by pressing    "Alt+Ctrl+T"  
  • Lock Screen by pressing    "Alt+Ctrl+L"
  • Minimize all tabs pressing "Ctrl+Super+D"
  • All shortcuts you can get by holding "Windows" or "Super" key
  • To update Ubuntu enter two commands in terminal
               1)  "sudo apt-get update" to get update software list
               2)  "sudo apt-get upgrade" to update software(s) i.e. apply updates
  • To install 'rar' file type enter command in terminal. It will added to "Archive Manager" application.
                    "sudo apt-get install rar"


Hope this information will help you.
I would really appreciate your feedback, suggestions, requests and ideas.

Thank You.


How to install Ubuntu alongside Windows 7 (safe dual boot)?


       In this post I will show you how to install Ubuntu without creating partition, deleting data and all this complex job. If you install this way then you can also easily remove (uninstall) without affecting windows OS and it's data.

       I will show this method by installing Ubuntu 12.04 LTS and this can be done also to (dual boot with windows 7) install Ubuntu 14.04 LTS. I am using wubi.exe which is inside image file of ubuntu 12.04 LTS. Follow the below steps to dual boot your computer safely. This may work on windows 8 Legacy mode.

This is also known as SAFE DUAL BOOT.

Install:

1.   Download image (*.ISO) of Ubuntu from it's official site. You can also directly
      download it from here. Then copy it in a drive in which you wanna to install
      ubuntu and also to C: drive.

2.   Open ubuntu-12.04-desktop-i386.iso with WinRAR software. Double click on wubi.exe
          you will see this window.
ubuntuRAR

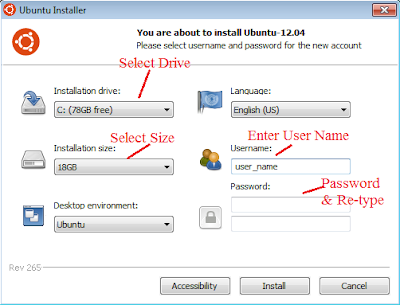
3.   Select a drive in which you wanna to install Ubuntu. You can install it in
      C: drive that will not cause any problem.
wubi.exe window


4.   Do these steps in above window of wubi.exe
  • Select size from drop down list (minimum 10 GB recommended).
  • Enter user name
  • Enter password and re-type it.
  • Now click on install
5.   This will show two options one is Reboot now and other is Reboot manually
     later. Click to reboot now to install now and restart your computer.
reboot


6.   Now your computer restarts and installation will start. After installation it
      will again restart and display Windows Boot Manager. Select Ubuntu from that
      to start with Ubuntu.Now your job is done further process will done
      automatically.
      

Uninstall:

1.   Open Programs and Features in Windows from "Control Panel" > "Programs and
          Features". You will see Ubuntu as installed program.
Programs and Features

2.   By double click on Ubuntu a window will pop up for conformation of
     uninstall Ubuntu. Click on Uninstall and in a few second OS will be removed from
     your computer. 
Uninstall


Hope this information will help you.
I would really appreciate your feedback, suggestions, requests and ideas.

Thank You.